
よくサイトのファーストビューにある下へのスクロールを促すアニメーションを実装してみたいニャ
サイトのファーストビューにある「SCROLL」などというテキストとともに線や丸が動いて下へとスクロールを促すアニメーションを見たことがあると思います。そちらの実装方法をデモサイトを見ながら解説していきます。
はじめに
サイトのファーストビューにある「SCROLL」などというテキストとともに線や丸が動いて下へとスクロールを促すアニメーションと聞いてもピンとこない方もいるかも知りません。具体的にはこのような動きがファーストビューに設置されているものをいいます。
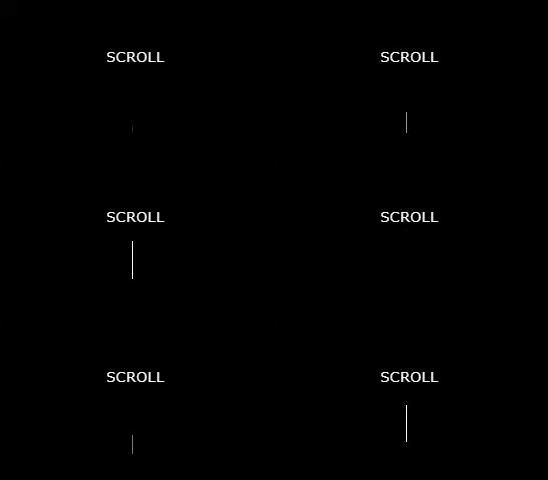
スクロールダウンアニメーションの実装はCSSの「animation」プロパティと「keyframes」というアットルールを指定することで簡単に実行可能です。
CSSの「animation」プロパティと「keyframes」は動きのあるサイトでは必ず使われているものになりますので、スクロールダウンアニメーションは「keyframes」の書き方も単純なので入門として最適であると思います。
アットルールというのは、スタイルシートで使う文字エンコーディングを定義する「@charset “utf-8”;」や、レスポンシブWEBデザインに対応するために各デバイス幅によってスタイルを定義するメディアクエリにおける「@media (max-width: 〇〇〇px)」のように、CSS の動作を既定するものです。
詳しくはこちら。
まずはデモサイト1をご覧ください。こちらは線が上下動を繰り返すことでスクロールダウンを誘導する最もオーソドックスなパターンかと思います。
コード
HTML
<div class="wrapper">
    <header>
        <div class="headerInner">
        <h1>LOGO</h1>
        </div>
    </header>
    <div class="container">
        <section id="heroImage">
            <div class="sectionInner">
                <div id="imageBg01" class="imageBg"></div>
                <div class="scrollDown"><span>SCROLL</span></div>
            </div>
        </section>
        <section class="contents"></section>
        <section class="contents"></section>
        <section class="contents"></section>
    </div>
    <footer>
        <div class="footerInner">
        <p>FOOTER</p>
        </div>
    </footer>
</div>
CSS
.wrapper {
  width: 100%;
}
header {
  width: 100%;
  height: 60px;
}
.headerInner {
  max-width: 1000px;
  margin: 0 auto;
  height: 100%;
  display: flex;
  justify-content: center;
  align-items: center;
}
h1 {
  font-size: 20px;
  color: #333;
  font-weight: bold;
}
.container {
  width: 100%;
}
section#heroImage {
  position: relative;
  width: 100%;
  height: calc(100vh - 60px);
}
section .sectionInner {
  position: absolute;
  top: 0;
  left: 0;
  width: 100%;
  height: 100%;
  clip-path: inset(0 0 0 0);
}
section .imageBg {
  position: fixed;
  top: 0;
  left: 0;
  z-index: -1;
  display: block;
  width: 100%;
  height: 100vh;
  background-size: cover;
  background-position: center;
}
section .imageBg::after {
  content: "";
  position: absolute;
  top: 0;
  left: 0;
  z-index: 1;
  display: block;
  width: 100%;
  height: 100%;
  background-color: rgba(0,0,0,.5);
}
section #imageBg01 {
  background-image: url(./images/imageBg01.jpg);
}

/*スクロールダウンの指定*/
.scrollDown {
  position:absolute;
  left:50%;
  bottom:10px;
  height:50px;
}

.scrollDown span {
  position: absolute;
  left: -20px;
  top: -15px;
  color: #fff;
  font-size: .7em;
  letter-spacing: 0.05em;
}

/* 線の描写 */
.scrollDown::after {
content: "";
position: absolute;
top: 0;
width: 1px;
height: 30px;
background: #fff;
animation: upDownEffect 2s ease-in-out infinite;
opacity:0;
}

/*線が上から下に動く*/
@keyframes upDownEffect {
0% {
  height:0;
  top:0;
  opacity: 0;
}
30% {
  height:30px;
  opacity: 1;
}
100% {
  height:0;
  top:50px;
  opacity: 0;
}
}


section.contents {
  max-width: 1000px;
  width: 100%;
  height: 700px;
  margin: 50px auto;
  background-color: rgb(45, 236, 173);
  border-radius: 25px;
}
footer {
  width: 100%;
  height: 100px;
  background-color: #333;
}
.footerInner {
  max-width: 1000px;
  height: 100%;
  margin: 0 auto;
  display: flex;
  justify-content: center;
  align-items: center;
}
.footerInner p {
  color: #fff;
  font-size: 20px;
  font-weight: bold;
}
ちょこっと解説
CSSが長くなりましたが、スクロールダウンアニメーションに使っている箇所だけ抜粋すると以下になります。
/*スクロールダウンの指定*/
.scrollDown {
  position:absolute;
  left:50%;
  bottom:10px;
  height:50px;
}

.scrollDown span {
  position: absolute;
  left: -20px;
  top: -15px;
  color: #fff;
  font-size: .7em;
  letter-spacing: 0.05em;
}

/* 線の描写 */
.scrollDown::after {
content: "";
position: absolute;
top: 0;
width: 1px;
height: 30px;
background: #fff;
animation: upDownEffect 2s ease-in-out infinite;
opacity:0;
}

/*線が上から下に動く*/
@keyframes upDownEffect {
0% {
  height:0;
  top:0;
  opacity: 0;
}
30% {
  height:30px;
  opacity: 1;
}
100% {
  height:0;
  top:50px;
  opacity: 0;
}
}
さらに今回のアニメーションで使っているところをさらに抜き出すと、
.scrollDown::after {
/*中略*/
animation: upDownEffect 2s ease-in-out infinite;
}
/*線が上から下に動く*/
@keyframes upDownEffect {
0% {
  height:0;
  top:0;
  opacity: 0;
}
30% {
  height:30px;
  opacity: 1;
}
100% {
  height:0;
  top:50px;
  opacity: 0;
}
}
「animation」というプロパティはショートハンドで、細かく一つずつに分解するとさらにこのようになります。
animation: upDownEffect 2s ease-in-out infinite;

/* こちらを一つずつ分解すると */

animation-name: upDownEffect;          /* アニメーションの名前 */
animation-duration: 2s;                  /* アニメーションが開始してから終了するまでの時間 */
animation-timing-function: ease-in-out;  /* アニメーションのイージング(加速度) */
animation-iteration-count: infinite;     /* アニメーションを繰り返す回数 */
そして上で指定した「upDownEffect」というアニメーションの名前を使って「keyframes」のアットルールの中で具体的な動きを指定していきます。
@keyframes upDownEffect {
0% {   /* 0%~(開始時点)のアニメーション */
  height:0;
  top:0;
  opacity: 0;
}
30% {  /* 30%~のアニメーション */
  height:30px;
  opacity: 1;
}
100% {   /* 100%~(終了時点)のアニメーション */
  height:0;
  top:50px;
  opacity: 0;
}
}
そして今回は「animation-iteration-count: infinite;」 アニメーションを繰り返す回数の値が infinite となっているためアニメーションの無限ループとなります。
円が線の上を上下するパターン
完成したら次は違うパターンも作ってみましょう。線の上を円が上下に動いて下スクロールを誘導するタイプでこちらも頻出するタイプです。
デモサイト2はこちら。
デモサイト1との変更点を見て行きましょう。
コード
/*スクロールダウンの指定*/
.scrollDown {
  position:absolute;
  left:50%;
  bottom:10px;
}

.scrollDown span {
  position: absolute;
  left: 10px;
  bottom: 0px;
  color: #fff;
  font-size: .7em;
  letter-spacing: 0.05em;
  -webkit-writing-mode: vertical-rl; /* 縦書きの指定 ベンダープレフィックス */
  writing-mode: vertical-rl;  /* 縦書きの指定 */
}

/* 丸の描写 */
.scrollDown::before {
  content: "";
  position: absolute;
  bottom: 0;
  left: -4px;
  width: 10px;
  height: 10px;
  border-radius: 50%;
  background: #fff;
  animation: circleMove 2s ease-in-out infinite,
             circleFade 2s ease-in-out infinite;
  }

/* 丸が上から下に動く */
@keyframes circleMove {
  0%  { bottom:45px; }
 100% { bottom:-5px; }
}
/* 丸が現れて徐々に消えていく */
@keyframes circleFade {
  0%  { opacity: 0;}
  50% { opacity: 1;}
  70% { opacity: .9;}
 100% { opacity: 0;}
}

/* 線の描写 */
.scrollDown::after {
  content: "";
  position: absolute;
  bottom: 0;
  width: 2px;
  height: 50px;
  background: #fff;
}
ちょこっと解説
主な変更点としては文字を縦書きにして、.scrollDown の疑似要素で前回のように縦線と、今回は円を作成し、円のほうに「circleMove」と「circleFade」というアニメーション名を定義して、「keyframes」でアニメーションの動きの状態を指定してあげています。
いったん覚えてしまえば使いまわせる動きなので最初はコピペでもOKなので、実際に使ってみましょう!


コメント